October 13, 2022

Live Snowflake Marketplace Data In Oracle

Access the Live Snowflake Marketplace Data in Oracle Database


What is Snowflake Data Marketplace?


Snowflake Data Marketplace connects the Providers of data with Consumers. The Snowflake Secure data sharing enables organizations to buy and sell the secure, governed data in Snowflake Data Marketplace.

The benefits of Snowflake Data Marketplace:

  • No data movement - Consumers are not required to copy the data, data is stored in provider accounts.
  • Ready to query data - Consumers can immediately start querying data without
  • transformation.
  • Discover a variety of data - Consumers can search for a variety of data -Finance, Marketing, Health and Life Sciences, Sports, Travel, Lookup tables, etc.
  • Live access - Receive real-time automatic updates.
  • Reduce cost - Eliminates the costs and delays associated with the traditional ETL processes of data loading and transformation

Steps to access the Live Snowflake Marketplace Data in the Oracle Database


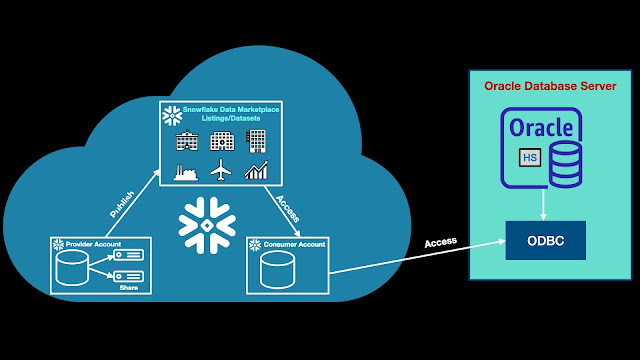
Architecture Diagram:


Here are the steps to access the Snowflake Marketplace data in Oracle 19c database running on Linux server.

1.    Login to Snowflake website and search for the required data sources in Snowflake Data Marketplace

2.    Get the data from Snowflake Marketplace, this will just create a pointer object in the Snowflake                 account, so that data can be accessed directly from the provider account. 
      For this demo, accessing the zip code data from Marketplace and named this share as                  
        “MP_ZIPCODE” in my Snowflake account

3.    Create a view in your Snowflake account database as below with the required columns/format joining the required tables from marketplace share that you got in previous step #2.

CREATE OR REPLACE VIEW VW_ZIPCODE AS
SELECT ZIP::VARCHAR(5) ZIP, USPS_ZIP_PREF_CITY::VARCHAR(30)
CITY_NAME,USPS_ZIP_PREF_STATE::VARCHAR(30) STATE_NAME
FROM "MP_ZIPCODE"."ZIPCODE_CROSSWALK"."CBSA_ZIP";

4.    Connect to Oracle database server

5.    Install Linux ODBC Driver Manager: unixODBC

  • Execute the following command to verify whether unixODBC is installed.

[root@localhost etc]# which odbcinst
/usr/bin/which: no odbcinst in (/usr/local/sbin:/usr/local/bin:/sbin:/bin:/usr/sbin:/usr/bin:/root/bin)

[root@localhost etc]# which isql
/usr/bin/which: no isql in (/usr/local/sbin:/usr/local/bin:/sbin:/bin:/usr/sbin:/usr/bin:/root/bin)

  • If unixODBC is not installed, as root execute the following commands:

# yum install unixODBC.x86_64

Installed:
unixODBC.x86_64 0:2.3.1-14.0.1.el7
Complete!

  • Verify the unixODBC installation:

[root@localhost etc]# which odbcinst
/bin/odbcinst

[root@localhost etc]# which isql
/bin/isql

[root@localhost ~]# odbcinst -j
unixODBC 2.3.1
DRIVERS............: /etc/odbcinst.ini
SYSTEM DATA SOURCES: /etc/odbc.ini
FILE DATA SOURCES..: /etc/ODBCDataSources
USER DATA SOURCES..: /root/.odbc.ini
SQLULEN Size.......: 8
SQLLEN Size........: 8
SQLSETPOSIROW Size.: 8

6.    Download the latest ODBC driver for Linux from:


7.     Install the ODBC Driver for Linux using the RPM package, downloaded at step #6

# yum install snowflake-odbc-2.25.5.x86_64.rpm

Installed:
snowflake-odbc.x86_64 0:2.25.5-1
Complete!

Note - The installation directory is “/usr/lib64/snowflake/odbc”

8. Configure the ODBC Driver

Update “/etc/odbc.ini” file as below:

[root@localhost etc]# cat odbc.ini
[ODBC Data Sources]
snowflakedb=SnowflakeDSIIDriver
[snowflakedb]
Driver = /usr/lib64/snowflake/odbc/lib/libSnowflake.so
Description =
Server = <Full Snowflake URL>
role = <Snowflake Role>
database = DEMODB
schema = SCHEMA1
warehouse = test_wh
Locale=en-US
PORT=443
SSL=on

9. Test the ODBC Driver

# isql -v snowflakedb <Snowflake account username> <account password>
+---------------------------------------+
| Connected! |
| |
| sql-statement |
| help [tablename] |
| quit |
| |
+---------------------------------------+
SQL> select zip, city_name,state_name from VW_ZIPCODE where zip='10001';
+------+-------------------------------+-------------------------------+
| ZIP | CITY_NAME | STATE_NAME |
+------+-------------------------------+-------------------------------+
| 10001| NEW YORK | NY |
+------+-------------------------------+-------------------------------+
SQLRowCount returns 1
1 rows fetched


10.    Oracle Database Configuration

10.1.    Create “initsnowflakedb.ora” in “$ORACLE_HOME/hs/admin” as below:

$ cd $ORACLE_HOME/hs/admin

$ cat initsnowflakedb.ora
# This is a sample agent init file that contains the HS parameters that are
# needed for the Database Gateway for ODBC
#
# HS init parameters
#
HS_FDS_CONNECT_INFO = "SNOWFLAKEDB"
HS_FDS_SHAREABLE_NAME = /usr/lib64/snowflake/odbc/lib/libSnowflake.so
HS_LANGUAGE=AMERICAN_AMERICA.WE8MSWIN1252
# HS_FDS_TRACE_LEVEL = Debug
# HS_FDS_TRACE_FILE_NAME = /tmp/hstrace.log
#
# ODBC specific environment variables
#
set ODBCINI=/etc/odbc.ini
#
# Environment variables required for the non-Oracle system
#

10.2. Update listener.ora in $ORACLE_HOME/network/admin as below:

[oracle@localhost admin]$ cat listener.ora

LISTENER =
(DESCRIPTION_LIST =
(DESCRIPTION =
(ADDRESS = (PROTOCOL = TCP)(HOST = localhost)(PORT = 1521))
(ADDRESS = (PROTOCOL = IPC)(KEY = EXTPROC1521))
)
)

SID_LIST_LISTENER=
(SID_LIST=
(SID_DESC=
(SID_NAME=snowflakedb)
(ORACLE_HOME=/u01/app/oracle/product/19.3.0/dbhome_1)
(ENVS="LD_LIBRARY_PATH=/usr/lib64:/usr/lib64/snowflake/odbc/lib:/u01/app/oracle/p
roduct/19.3.0/dbhome_1/hs/lib:/u01/app/oracle/product/19.3.0/dbhome_1/lib")
(PROGRAM=dg4odbc)
)
)


10.3. Add entry to “tnsnames.ora” in $ORACLE_HOME/network/admin as below:

snowflakedb=
(DESCRIPTION=
(ADDRESS=(PROTOCOL=TCP)(HOST=localhost)(PORT=1521))
(CONNECT_DATA= (SID=snowflakedb))
(HS=OK)
)

10.4. Start/Restart the listener

$ lsnrctl stop

$ lsnrctl start


10.5. Test connection

[oracle@localhost admin]$ tnsping snowflakedb

TNS Ping Utility for Linux: Version 19.0.0.0.0 - Production on 28-SEP-2022 23:31:12
Copyright (c) 1997, 2019, Oracle. All rights reserved.
Used parameter files:
/u01/app/oracle/product/19.3.0/dbhome_1/network/admin/sqlnet.ora
Used TNSNAMES adapter to resolve the alias
Attempting to contact (DESCRIPTION=
(ADDRESS=(PROTOCOL=TCP)(HOST=localhost)(PORT=1521)) (CONNECT_DATA=
(SID=snowflakedb)) (HS=OK))
OK (10 msec)


11. Connect to Oracle database and create the database link as below:

SQL> CREATE PUBLIC DATABASE LINK snowflakedb connect to
"<Snowflake account username>" identified by “<account password>”
using 'SNOWFLAKEDB';

12. Now access the Snowflake Marketplace live data in Oracle database

You can now execute the queries in SQL*Plus as below:

SQL> col zip format a10
SQL> col CITY_NAME format a30
SQL> col STATE_NAME format a30

SQL> select zip, city_name,state_name from VW_ZIPCODE@snowflakedb where zip='10001';

ZIP CITY_NAME STATE_NAME
---------- ------------------------------ ------------------------------
10001 NEW YORK NY


Click Here to watch my YouTube Video, that demonstrates each of the above steps in detail.


March 11, 2022

Oracle's AutoUpgrade Utility

The AutoUpgrade utility helps to upgrade one or many Oracle databases with a single command and single configuration file.

In this blog, explaining how to upgrade Oracle databases from 12.2 to 19.3 release using "AutoUpgrade" utility.

Benefits of AutoUpgrade:


  • The AutoUpgrade helps to upgrade one or many databases without human intervention, all with one command and a single configuration file.
  • The AutoUpgrade utility is designed to automate the upgrade process - It identifies issues before upgrade. It performs pre and post upgrade actions. It performs database upgrades and starts the upgraded Oracle databases.
  • It enables to schedule upgrades for future points in time
  • It enables to set, change or remove initialization parameters as desired
  • It enables you to call the custom scripts during the upgrade to configure databases.

Target Versions Supported:

The AutoUpgrade utility can be used to upgrade Oracle databases to below listed target versions:

  • Oracle Database 21c (21.3 and newer)
  • Oracle Database 19c (19.3 and newer)
  • Oracle Database 18c (18.5 and newer)
  • Oracle Database 12c Release 2 (12.2 + DBJAN2019RU and newer)


AutoUpgrade Modes: 

The steps that AutoUpgrade runs to upgrade the database depends on the processing mode that you select.

  • Analyze Mode: Setup, Prechecks.
  • Fixups Mode: Setup, Prechecks, and Prefixups.
  • Deploy Mode: Setup, guaranteed restore point (GRP), Preupgrade, Prechecks, Prefixups, Drain, DB (database) Upgrade, Postchecks, and Postupgrade. You can run your own scripts before the upgrade (Preupgrade stage) or after the upgrade (Postupgrade stage), or both before and after the upgrade.
  • Upgrade Mode: Setup, DB (database) Upgrade, Postchecks, and Postfixups.


Autoupgrade - Steps


        1. Download and install the Oracle 19.3 software binaries.


I have already installed Oracle 19.3 software. 


2. Verify Java version. 


The AutoUpgrade Utility requires Java 8. 


[oracle@localhost ~]$ $ORACLE_HOME/jdk/bin/java -version


java version "1.8.0_201"

Java(TM) SE Runtime Environment (build 1.8.0_201-b09)


Note - Oracle_home is the Target Oracle Database home. 


          3. Download the latest AutoUpgrade version

  • The autoupgrade.jar file exists by default, in Oracle Database 19c (19.3) and later targets Oracle homes. Oracle strongly recommends downloading the latest AutoUpgrade version from My Oracle Support Document 2485457.1.
  • The autoupgrade.jar file exists in the $ORACLE_HOME/rdbms/admin directory. 
  • For both Oracle Database 12c Release 2 (12.2) and Oracle Database 18c (18.5) target homes, you must download the AutoUpgrade kit from My Oracle Support Document 2485457.1.
  • Run below command to verify AutoUpgrade version:

[oracle@localhost admin]$ cd $ORACLE_HOME/rdbms/admin


[oracle@localhost admin]$ $ORACLE_HOME/jdk/bin/java -jar autoupgrade.jar -version


Note - Oracle_home is the Target Oracle Database home. 


  • Download the latest autoupgrade.jar file from My Oracle Support Document 2485457.1. Replace “autoupgrade.jar” which is already present in $ORACLE_HOME/rdbms/admin directory, with latest downloaded file.
  • Now run below command to verify AutoUpgrade version. 

It should be latest version as below:


[oracle@localhost admin]$ $ORACLE_HOME/jdk/bin/java -jar autoupgrade.jar -version


        4. Create the Configuration file as below. AutoUpgrade configuration files contain all the information required to perform Oracle Database upgrades.


        5. Run Autoupgrade in Analyze mode to start analysis.


$ORACLE_HOME/jdk/bin/java -jar $ORACLE_HOME/rdbms/admin/autoupgrade.jar -config /u01/app/oracle/admin/autoupgrade/config.txt -mode analyze


        6. The main commands to monitor the Autoupgrade jobs, from Autoupgrade console are as below:


lsj – Lists the jobs by status

status – Lists the status of a particular job or all jobs

tasks – Displays the tasks that are running.


        7. Review the analysis Summary report.


            8. Once Autopgrade in Analyze mode completed successfully, run Autoupgrade in Deploy mode to start the database upgrade process as below:


$ORACLE_HOME/jdk/bin/java -jar $ORACLE_HOME/rdbms/admin/autoupgrade.jar -config /u01/app/oracle/admin/autoupgrade/config.txt -mode deploy


            9. Review the AutoUpgrade log files for any errors


    10. Databases upgraded from 12.2 to 19.3 successfully, using the Autoupgrade tool.
            

         Connect to databases and verify.  


         The Autoupgrade tool updates the new target Oracle home in “/etc/oratab” for all upgraded databases.


                    Database 1:


                           Database 2: